
Write Your First Wetator Test
You have managed the installation so let us write our first real test case.
For this mini tutorial we use a simple web form from https://www.wetator.org/testform.
Wetator supports three different file formats for storing of test definitions:
- wett - a simple text file with a wiki/markdown like notation
- wet - xml based test definiton
- xls - use Excel to define/edit your test cases
For this tutorial we will use Excel.
Before We Start
- Create a new folder e.g. 'first-steps'
- Copy the file 'wetator.config' from directory 'templates' to the root of your new test directory.
This file defines Wetator's setup. There is no need to change everything for the moment. - Copy the file empty.xls from directory 'templates' also to the root of your test directory.
Rename the file into 'first-test.xls'. - Start Excel and open 'first-test.xls'.
- Type wetator -p first-steps\wetator.config [Enter]
- A small popup window appears. Please choose the file 'first-test.xls' and click on open.
- Wetator executes all commands form the selected file. A small progress report is written to the console.
- If everything works fine you will end with some output like
Tests run: 0, Failures: 0, Errors: 0
- Wetator writes a detailed protocol for every test run. You can find this protocol in the folder 'logs'. Open the file 'run_report.xsl.html' with your browser.
So far we have anything ready to write our first test. We have an (empty) excel test definition file, a configuration and the result report visible in the browser. Your screen might look like this.
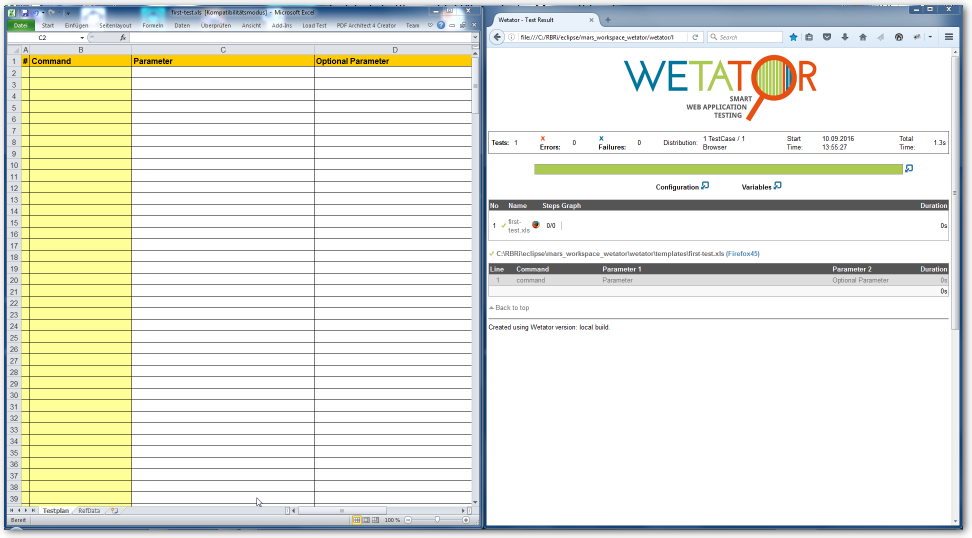
Step 1 - Open the Page
Now it is time to add our first test step - our test starts by opening the webpage 'https://www.wetator.org/testform'.

- for the command use Open Url (if you like, you can choose from the list of supported commands)
- the url is the first (and only) parameter you have to provide
- save the file
- Switch to the command window and run wetator again (Type wetator -p first-steps\wetator.config [Enter])
- A small popup window appears. Please choose the file 'first-test.xls' and click on open (Wetator remembers the directory/file selected during the last run)
- If everything works fine you will end with some output like
Tests run: 1, Failures: 0, Errors: 0
- refresh you browser content to see the current result output
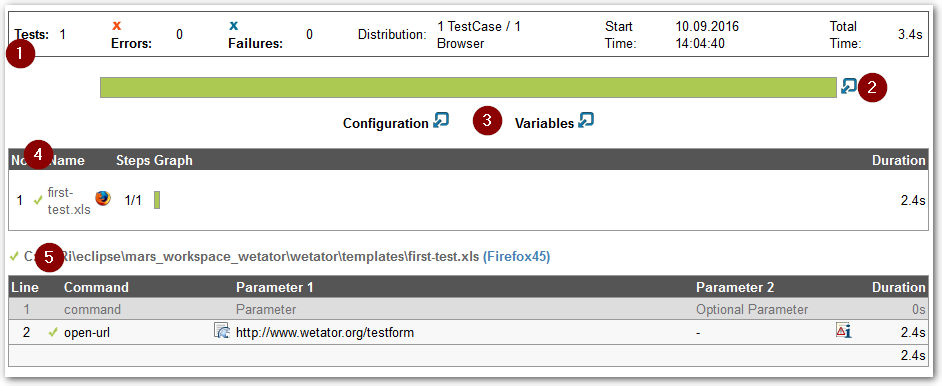
The report shows many info about your test
- The overview: you can see the number of executed test, the number of successful/failed test and more
- A graphical overview of the success rate; you can click on the icon to get some more details
- Click on the icons to show/hide the configuration details used for this test run
- This part present an overview of every single test case executed
- And finally all the details of every single test case
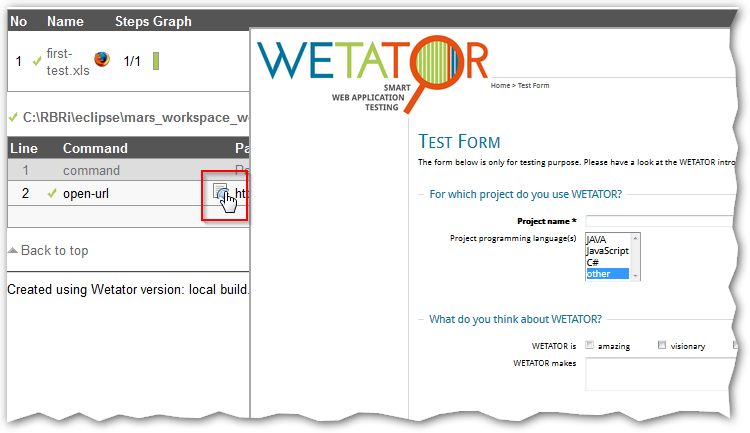
The report also contains snapshots of all the retrieved web pages. You can either hover the snapshot icon with the mouse or click on the icon to see a lager snapshot in a separate window.
Step 2 - Check That We See the Right Content
It is good practice to prove to get the correct page as result of opening an url. Wetator has two commands for this kind of checks:
assert-title and
 assert-content.
- please add the command 'Assert Title' with parameter 'WETATOR / Test Form'. (Title comparison is done case sensitive)
- please add the command 'Assert Title' with parameter 'The form below is only for testing purpose'
- Rerun your test and refresh the browser window.
If everything is correct you should get something like this
Step 3 - Fill the Form
Now we start doing some real stuff; at first we fill the form.
The used Wetator commands are:
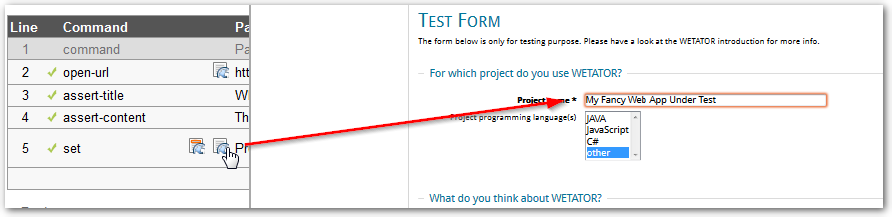
For filling the 'Project name' field we simply add the command
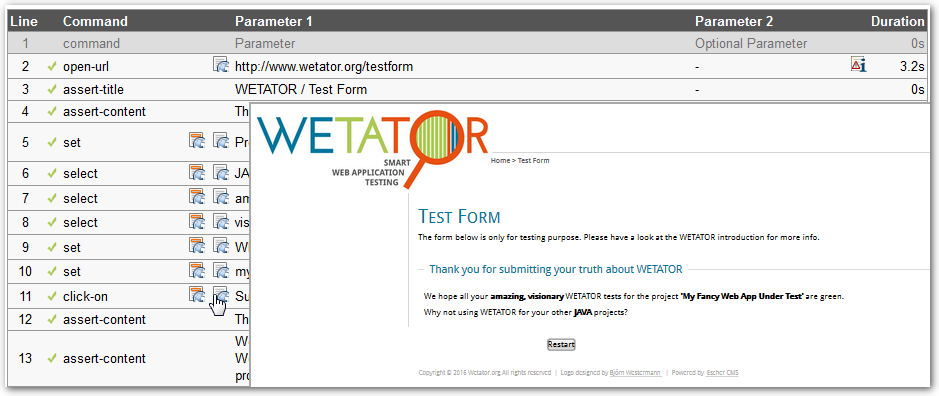
The 'set' command requires two parameters, the first one points to the entry field and the second is the new value.
When running the test your report will offer two different screenshots for this command. This is because the set command (and many others) is modifying your application. Wetator takes a screenshot before executing the command and one of the resulting page.

Additionally Wetator will highlight the input control being the target of the action.
Filling the whole form is simple.

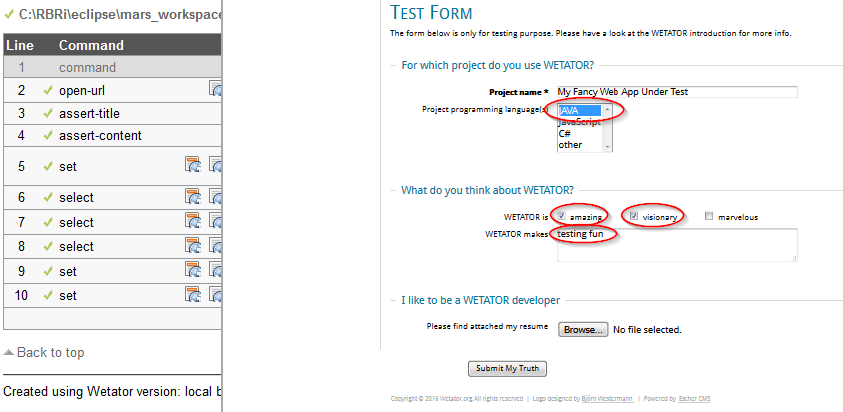
Because of technical restrictions it is not possible to show the correct value for the file upload control.
Step 4 - Submit the Form and Check the Results
Finally we have to submit the form.
The command to use is simply click-on
And for checking the result we can use again assert-content

That is more or less all.
Congratulations, you have written your first Wetator test.
Next Steps
You have written your first Wetator test.
Now it is time to start writing tests for your application. To help you with this task we have some more documentation for you:
- Philosophy - a short overview about the idea we had in mind when building Wetator
- Command reference - quick access to the detailed documentation of all supported commands
- FAQ - maybe your question was asked before
- Support - don't be shy; if you have any questions/problems/suggestions please contact us